Initiating an Electronic Payment
PURPOSE
This guide describes how to initiate an Electronic Funds Transfer (EFT) from cash settlements that have already been captured and approved through the normal payment workflow.
The process follows five steps:
1. Set Payment Configuration — assign the funding account, beneficiary, payment type, and all required payment fields on EFT Payment Config.
2. Verify — a checker confirms the payment data is complete and correct.
3. Approve — one or more authorisers approve the payment against the Banking Mandate for the funding account.
4. Send — a fully approved payment is batched and dispatched to the bank from EFT Control.
5. Rebatch — if the bank rejects an item, the cause is corrected and the payment is re-submitted in a new batch.
Three screens support this workflow:
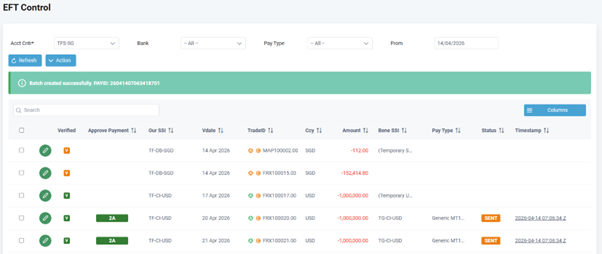
• EFT Control
The main worklist. Shows all payments ready for action. Used for bulk approval, batch dispatch (Send), and monitoring bank responses.
• EFT Payment Config
The detail screen for a single payment. Used for Steps 1–3 and for correcting a rejected payment before rebatch.
• EFT Batching
The batch detail screen. Opened by clicking a batch reference on EFT Control. Shows each item in the batch and the bank’s response (including failure reasons).
WHY IS THIS IMPORTANT?
The EFT initiation workflow is the final gate before money leaves the enterprise. A user running this process is:
1. Confirming that every payment has been verified by a checker and carries all the data the bank needs.
2. Applying the Banking Mandate — making sure the correct number of authorisers from the correct groups have approved each payment for its amount tier.
3. Releasing the batch to the bank with a full audit trail so that each payment is locked against the batch and cannot be paid twice.
4. Handling items the bank rejects so corrected payments can be re-initiated without creating duplicate payments.
Getting this workflow right ensures on-time settlement, a clean audit trail, and prevents both missed payments and double payments.
KEY CONCEPTS
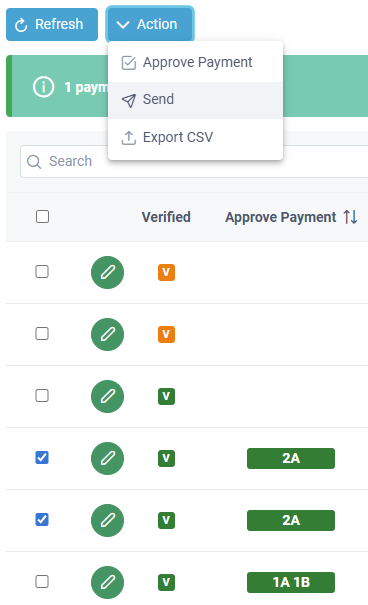
APPROVAL BADGES
Each payment on EFT Control and EFT Payment Config shows a colour-coded “Approve Payment” badge reflecting its authorisation state:
| State | Badge | Meaning |
|---|---|---|
| Pending | (no badge) | No approvals recorded yet |
| Partially | ORANGE | Some approvers have signed off but the approved mandate rule is not yet fully met |
| Fully approved | GREEN | All required approvers have signed off; he payment is eligible to be sent |
Only fully approved (GREEN) payments are eligible to be batched and sent.
VERIFIED BADGE
Each row on EFT Control also shows a “V” badge:
| State | Colour | Meaning |
|---|---|---|
| Verified | GREEN | A checker has confirmed the payment data |
| Not verified | ORANGE | Payment has not yet been verified |
VERIFIED VS UNVERIFIED
Verification is a separate control from approval. A payment must be verified before an authoriser can approve it. Unverifying a payment CLEARS ALL EXISTING APPROVALS and resets the badge to pending, because an unverified payment can no longer be trusted as the basis for those approvals.
BANKING MANDATE
The mandate for the funding account defines amount tiers and, for each tier, the signing combinations required — for example “2 from Group A” or “1 from Group A AND 1 from Group B”. The system checks the approvers on the payment against the tier that matches its amount.
BATCH CREATION AND DISPATCH
Batching and dispatch are a single operation. When the user selects approved payments on EFT Control and clicks Action > Send, the system validates, confirms, creates the batch, and transmits it to the bank immediately. There is no separate “generate” step. A batch reference (PAYID) is stamped on each payment and appears as a clickable link.
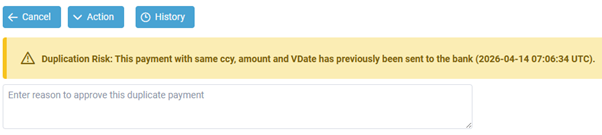
DUPLICATE PAYMENT DETECTION
Before approving a payment, the system checks whether a payment with the same key attributes has already been sent to the bank. If a potential duplicate is detected, a yellow warning banner appears on EFT Payment Config. The user must enter a reason to override the warning before Approve Payment is permitted. This is particularly important during rebatch — see Step 5 and FAQ11.
EFT STATUS
| Status | Meaning |
|---|---|
| (blank) | Not yet sent |
| SENT | Transmitted to bank; awaiting response |
| SUCCESS | Bank accepted and processed the payment |
| FAIL | Bank rejected the payment — see Fail Reason |
BEFORE YOU BEGIN
Before a payment can be processed through this workflow, confirm that:
• The cash settlement has been captured and approved through the normal payment workflow.
• The funding account is linked to an approved Banking Mandate.
• Your user is a member of a group within that Banking Mandate.
Required user rights:
• “Approve Payment” — to approve on EFT Control / EFT Payment Config.
• “Verify Payment” — to verify / unverify on EFT Payment Config.
• “Generate Payment Batch” — to run Send on EFT Control.
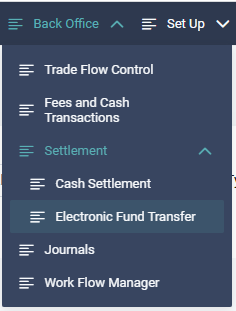
NAVIGATING TO EFT CONTROL
1. From the main menu, select Back Office > Payments > EFT Control.
The EFT Control screen is displayed. Select an Accounting Centre and click Refresh to load the list of payments.
The available filters are:
• Accounting Centre Required.
• Bank Optional — filter by bank counterparty.
• Pay Type Optional — filter by payment type.
• From Optional — value date on or after.
2. The results grid shows one row per payment:
• Checkbox Select for a bulk action.
• Pencil icon Opens EFT Payment Config for this payment.
• Verified (V) GREEN = verified; ORANGE = not verified.
• Approve Payment GREEN = fully approved; ORANGE = partially approved; no badge = pending.
• Our SSI Funding account.
• Vdate Value date.
• Trade ID Trade reference (with authorisation and confirmation flag icons).
• Ccy / Amount Currency and payment amount.
• Bene SSI Beneficiary account.
• Pay Type Payment type.
• EFT Status Bank response (SUCCESS / FAIL; blank if not yet sent).
• Timestamp Once sent, shows the batch reference as a clickable link to EFT Batching.
The grid has a live search box and a Columns toggle button.

STEP 1 — SET PAYMENT CONFIGURATION
3. Click the pencil icon on a payment row to open EFT Payment Config.
4. In the Payment Config panel, assign the payment routing:
• Our Bank Select the bank that holds the funding account. When you change this, the Our SSI list updates automatically.
• Our SSI Select the specific funding account. When you change this, the Payment Type list updates to show only compatible types.
• Payment Type Select the payment type. When you change this, the dynamic fields panel refreshes.
• Beneficiary Select the beneficiary counterparty. When you change this, the Their SSI list updates.
• Their SSI Select the beneficiary’s bank account.
Below the routing fields (separated by a line):
• Settlement Charge Optional charge amount.
• Description Free-text description of the charge. Our SSI must be set before a settlement charge can be saved.
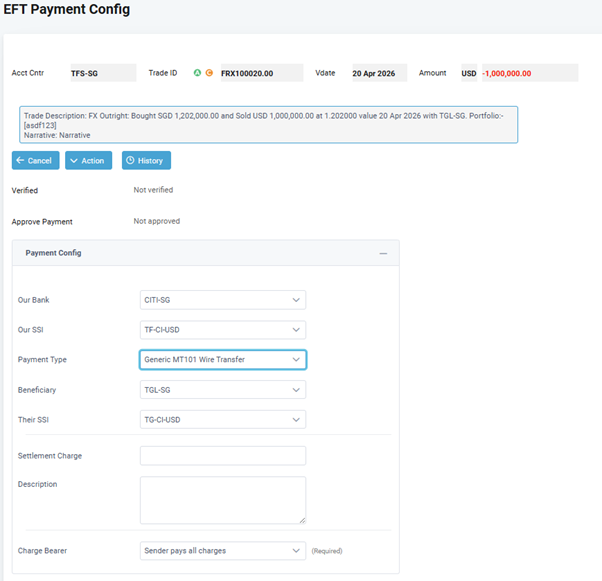
5. If a Payment Type is selected, a second section appears below with the payment-type-specific fields. These are defined by the payment type and may be text, number, dropdown, or checkbox inputs. Mandatory fields are indicated.
If the payment type has no additional fields configured, the message “No payment fields configured for this payment type” is shown.
6. Once all routing and payment fields are complete, click Action > Save to save the payment configuration.
The payment is now ready for verification.
STEP 2 — VERIFY / UNVERIFY
7. VERIFYING A PAYMENT
On EFT Payment Config, click Action > Verify to confirm that the payment data is complete and correct.
Before accepting the verification, the system checks that:
• The cash settlement has been approved in the normal payment workflow.
• A Payment Type is assigned.
• Our SSI and Their SSI are both assigned.
• The enterprise-level and beneficiary-level payment data for the payment type have been approved.
• All mandatory fields for the payment type are populated.
• The payment is not already locked in a sent or processed batch.
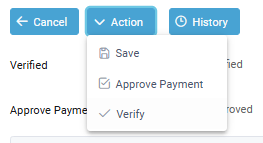
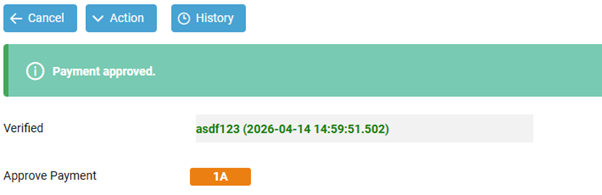
On success, the Verified status line changes to show your name and the date and time in green. The Verify option in the Action menu is replaced by Unverify. The “V” badge on EFT Control turns GREEN.
Note: Verification is a data check only — it does not record an approval.

8. UNVERIFYING A PAYMENT
If a data issue is found after verification, click Action > Unverify. A confirmation prompt appears — click Yes.
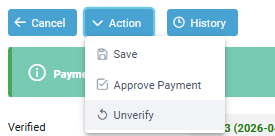
The system:
1. Clears the Verified flag.
2. CLEARS ALL EXISTING APPROVALS on this payment.
3. Records the unverify action in the payment’s audit history.
The payment reverts to pending — it must be corrected, re-verified, and re-approved before it can be sent.
Note: Unverify is blocked if the payment is already in a batch that has been sent or processed.
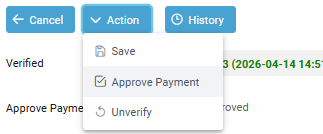
STEP 3 — APPROVE
9. APPROVING FROM EFT PAYMENT CONFIG (SINGLE PAYMENT)
On EFT Payment Config, click Action > Approve Payment. The same validation rules from Step 9 apply.
If the system detects a potential duplicate payment, a yellow warning banner appears before the approval can proceed.
Read the warning carefully:
• If the payment is NOT a duplicate, enter a clear reason in the text field (e.g. “Confirmed with bank — original payment not processed”) and then click Action > Approve Payment again.
• If the payment IS a duplicate, do not proceed. Contact your supervisor or the bank to resolve the position.
Once approved, the Approve Payment badge turns ORANGE or GREEN accordingly. When fully approved, the Approve Payment option no longer appears in the Action menu.
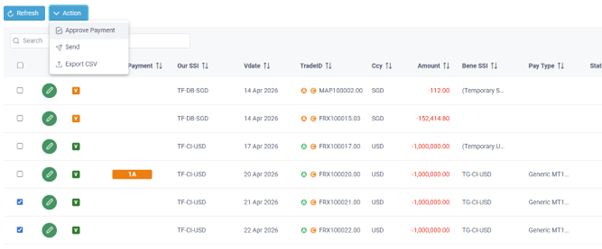
10. APPROVING FROM EFT CONTROL (BULK)
On EFT Control, tick the checkboxes next to the payments you want to approve (only verified payments can be approved), then click Action > Approve Payment.
The system validates each selected payment:
1. The payment must be verified (green “V” badge).
2. Your user must be a member of a group within the Banking Mandate governing the payment.
3. You cannot have already approved the same payment.
4. The Banking Mandate must be in an approved state.
5. The Banking Mandate must have a tier that matches the payment amount.
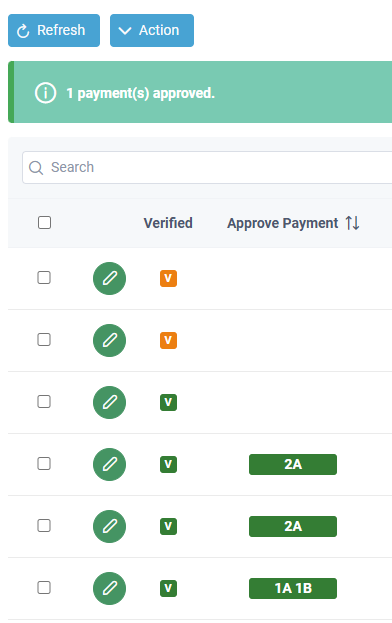
If all checks pass, your approval is recorded and the Approve Payment badge updates:
• Any mandate rule fully met → GREEN (fully approved).
• Otherwise → ORANGE (partially approved).
If a check fails, a message describes which payments could not be approved and why.
STEP 4 — SEND TO BANK
11. On EFT Control, tick the checkboxes next to the payments you want to dispatch. Only fully approved (GREEN badge) payments can be sent.
Click Action > Send.
12. The system validates the selection (for example, that all selected payments are of a compatible payment type). If validation fails, a message is shown and nothing is sent.
If validation passes, a confirmation prompt appears:
“Payment instructions will be pushed to the bank. Do you want to continue?”
Click Yes to proceed.
The system creates a batch containing the selected payments and immediately transmits it to the bank. A success message shows the timestamp of the record.
13. After the bank responds, click Refresh on EFT Control. The EFT Status column updates:
• SUCCESS — bank accepted and processed the payment.
• FAIL — bank rejected the payment.
Click the Timestamp link to open EFT Batching and review the bank’s response for each item.
STEP 5 — REBATCH FAILED PAYMENTS
14. If one or more items in a batch show FAIL status, click the Timestamp link on EFT Control to open EFT Batching.
EFT Batching shows every item in the batch with its bank response. The columns relevant to failure are:
• EFT Status FAIL for rejected items.
• Bank Ref The bank’s reference (populated on success).
• Fail Reason The bank’s rejection text.
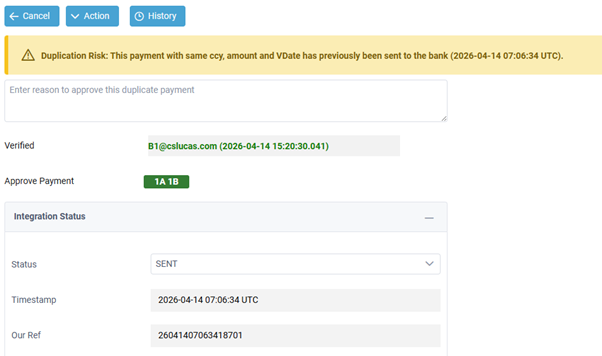
Note: To prevent duplicate payments, a warning will appear if the system detects a previously sent payment with the same VDate, Ccy, and Amount. For example, this has happened because both payments are for the same amount, albeit for different trades. User will need to verify that this is not a duplicate and provide a message for subsequent audit.
15. DUPLICATE PAYMENT WARNING ON REBATCH
When you open a failed payment on EFT Payment Config, check the Integration Status panel:
• Status Shows FAIL (the bank’s response).
• Bank Ref If populated, the bank assigned a reference — this may mean the bank did process the payment before returning an error.
• Remarks The bank’s detailed rejection or error text.
IMPORTANT: Before correcting and re-submitting a failed payment, confirm with the bank whether the original payment was processed. A FAIL status in the system does not always mean the bank did not execute the transfer — network timeouts and late acknowledgements can cause a mismatch.
When you proceed to approve the corrected payment, the system may display a yellow DUPLICATE PAYMENT WARNING because the payment was previously sent. This is the system’s alert that a double payment is possible.
• If you have confirmed with the bank that the original was NOT processed: enter a reason in the text field (e.g. “Bank confirmed original not processed — Ref: ABC”) and proceed with Approve Payment.
• If the original WAS processed, or you are unsure: DO NOT proceed. Rebatching in this state will cause a double payment. Escalate to your supervisor and handle the position with the bank directly.
17. CORRECTING THE PAYMENT
On EFT Payment Config, correct the payment configuration that caused the failure:
• Update Our SSI, Their SSI, or Payment Type if the wrong account or channel was used.
• Update the relevant payment fields if a mandatory field was missing or incorrectly formatted.
Click Action > Save to save the corrected configuration.
Note: Changing the payment configuration may trigger automatic unverification if the data that was verified has changed. In that case the Verified status will revert and you must re-verify the payment before it can be re-approved.
18. RE-VERIFY AND RE-APPROVE
If the payment was unverified during correction:
a. Review all the payment data to confirm it is correct.
b. Click Action > Verify (Step 7).
c. Click Action > Approve Payment (Step 10), entering the duplicate override reason if prompted.
If the payment remained verified, you still need to record a fresh approval:
a. Click Action > Approve Payment (Step 10), entering the duplicate override reason if prompted.
[IMAGE: w6_eft-payment-17.png]
19. SEND AGAIN
Return to EFT Control. The corrected payment appears in the list. Confirm it shows a GREEN Approve Payment badge.
Tick the checkbox and click Action > Send (Step 11–12) to create a new batch and dispatch it to the bank.
Note: The rebatch creates an entirely new batch with a new batch reference. The original failed batch is not modified. The payment’s audit history (accessible via the History button on EFT Payment Config) records the full trail of both
the original batch and the rebatch.
[IMAGE: w6_eft-payment-18.png]
OTHER ACTIONS ON EFT PAYMENT CONFIG
VIEWING THE INTEGRATION STATUS
Once a payment has been sent, an Integration Status panel appears automatically on EFT Payment Config. It shows:
• Status GENERATED, SENT, SUCCESS, or FAIL. This field is editable for operations staff who need to manually correct the status when the bank’s response was received outside the system.
• Timestamp When the most recent status event occurred.
• Our Ref The batch reference sent to the bank.
• Bank Ref The bank’s own reference, from the acknowledgement.
• Remarks The bank’s remarks or rejection reason.
To update the Status, select the correct value and click Action > Save.
VIEWING THE CHANGE HISTORY
Click the History button on EFT Payment Config to open the full audit trail for the payment — every configuration change, verify and unverify action, each approval, batch assignment, and bank response are recorded with the user, date, and time.
NOTES AND LIMITATIONS
• Verification before approval. A payment cannot be approved until it has been marked Verified. Approving an unverified payment is blocked with a validation message.
• Unverify clears approvals. Every approval on the payment is removed when it is unverified. The change is recorded in the audit history. Use with care.
• Unverify is blocked on sent payments. Once a payment has been added to a batch that has been sent or processed, it can no longer be unverified. Corrections must be handled through the rebatch path (Step 5).
• Duplicate approvals are blocked. The same user cannot approve the same payment twice.
• Send is a single step. Action > Send on EFT Control creates the batch and transmits it to the bank immediately — there is no separate “generate only” step.
• Payments are locked once batched. A payment cannot be included in a second batch until it is released by a bank rejection (FAIL).
• EFT Batching is a read-only viewer. It shows items in a specific batch and their statuses. It is reached only by clicking the batch reference link on EFT Control, not from the main menu.
• Rebatch creates a new batch. There is no “retry” on the original batch. The corrected payment is sent in a brand-new batch with a new batch reference.
• Double payment risk on rebatch. A FAIL status does not guarantee the bank did not process the payment. Always confirm with the bank before rebatching. The system will display a duplicate payment warning to prompt this check.
• Settlement Charge. An optional charge and description can be entered on EFT Payment Config. Our SSI must be assigned first.
• Automatic batching. If scheduled batching is configured, batches may be generated and sent automatically. These appear on EFT Control attributed to the system user.
FREQUENTLY ASKED QUESTIONS
FAQ01. What do the orange and green badges mean on EFT Control?
There are two badges per row.
The “V” badge reflects verification: GREEN = verified by a checker; ORANGE = not yet verified.
The “Approve Payment” badge reflects mandate authorisation: ORANGE = partially approved (some approvers have signed off but the mandate rule is not yet fully met); GREEN = fully approved and eligible to be sent. No badge = no approvals
yet.
FAQ02. Why is Approve Payment blocked for me?
On EFT Control, one of the following applies:
– The “V” badge is orange (payment is not verified).
– You are not a member of any group in the Banking Mandate governing this payment.
– You have already approved this payment.
– The Banking Mandate is not approved, or has no tier that matches the payment amount.
On EFT Payment Config, if Approve Payment does not appear in the Action menu at all, the payment is already fully approved.
FAQ03. I clicked Unverify by mistake — can I recover the approvals?
No. Unverify deliberately clears every approval so that a re-check is forced before the payment can be authorised again. The original approvers must re-approve after re-verification. The full trail is in the History (accessible via the History button on EFT Payment Config).
FAQ04. Why is my fully approved payment not being sent?
The Send action validates the selection. Common causes:
– The selected payments belong to incompatible payment types.
– One or more items are not fully approved (no GREEN badge). Review the message shown on screen and correct the issue.
FAQ05. What is the difference between “Our Ref” and “Bank Ref”?
Our Ref (PAYID) is the reference generated when the batch is created. It is sent to the bank and echoed back in the acknowledgement so the system can match the reply. The Bank Ref is the bank’s own identifier, captured from the acknowledgement for reconciliation.
FAQ06. The batch status shows FAIL for an item. What does that mean?
The bank rejected that payment. Click the Timestamp link on EFT Control to open EFT Batching and read the Fail Reason. Click the pencil on the item to open EFT Payment Config, where the Integration Status panel shows the bank’s full remarks. Then follow Step 5 (Rebatch).
FAQ07. I cannot see a Timestamp link on a row. What does that mean?
The Timestamp column is blank for payments that have not yet been included in a batch. Once a payment has been batched via Action > Send, a clickable batch reference appears.
FAQ08. Can the same payment be in two batches at the same time?
No. Once a payment is in a batch, it is locked. It is only available for rebatch after a bank rejection (FAIL status).
FAQ09. Can I cancel a batch after clicking Send?
No. Once the batch has been transmitted to the bank it cannot be cancelled from the system. Any cancellation has to be arranged directly with the bank.
FAQ10. Can I correct the EFT status manually?
Yes. Open the payment on EFT Payment Config. If it has been sent, the Integration Status panel is shown and the Status field is editable. Select the correct value and click Action > Save.
FAQ11. I am rebatching a failed payment and the system is showing a DUPLICATE PAYMENT WARNING. What should I do?
This warning means the system has detected that this payment was previously sent to the bank. A FAIL response from the bank does not always mean the bank did not execute the transfer — network timeouts, cut-off misses, or delayed acknowledgements can cause the bank to have processed the payment while the system records it as failed.
BEFORE overriding this warning:
1. Contact the bank and quote the original batch reference (Our Ref) shown in the Integration Status panel.
2. Ask the bank to confirm whether the original payment was processed or rejected.
3. Check whether a Bank Ref has been populated in the Integration Status panel — if it has, the bank may have assigned a reference before returning the error, which increases the risk that it was processed.
IF THE BANK CONFIRMS THE ORIGINAL WAS NOT PROCESSED:
Enter a clear reason in the text field (e.g. “Confirmed with [bank] on [date] — original payment not processed. Ref: [bank contact/ticket]”) and proceed with Approve Payment.
IF THE ORIGINAL WAS PROCESSED OR YOU ARE UNSURE:
DO NOT enter a reason or proceed. A double payment will result. Escalate to your supervisor. The position must be resolved with the bank (reversal, offset, or write-off) before any rebatch can be considered.
Every duplicate override is recorded permanently in the payment’s audit history, including the reason entered and the user who approved the override.
FAQ12. How many times can a payment be rebatched?
There is no system limit. However, each rebatch carries the duplicate payment risk described in FAQ11. The payment’s audit history (History button on EFT Payment Config) records every batch assignment so the full retry trail is auditable.
FAQ13. How do I see the full history of a payment — including all
batches it has been in?
Click the History button on EFT Payment Config. This opens the audit trail showing every action on the payment, including each batch assignment, verify/unverify, approval, and bank response, with user, date, and time for each entry.
RELATED INFORMATION
User Guide — Cash Settlement (creating cash settlements)
User Guide — Banking Mandate Maintenance
User Guide — SSI Maintenance and Payment-Type Defaults
User Guide — Entity Payment Type Setup
Technical Reference — Payment Framework (internal)
CHANGE HISTORY